Proxy an iOS App to a Dev or Test Server
Table of Contents

DISCLAIMER #
This procedure describes a configuration that carries some security risk. In fact, most local developer environments host a variety of security risks: locally stored passwords and keys, production data, proprietary source code and secrets, etc. If you’re working on a proprietary project you should confirm with your IT or InfoSec department that running a local Man-in-the-Middle proxy is allowed. Read Man-in-the-middle attack to understand why all this mitm stuff keeps CISOs up at night.
Finally, while the setup can be very useful and is widely shared among developers, you should absolutely not run the proxy when not in use and remove any added CA certs when there is no longer a need.
More formally:
This Man-in-the-Middle (MITM) proxy setup is provided for educational, testing, and debugging purposes only. It is not intended for any unauthorized, malicious, or unethical activities. By using this tool, you agree to take full responsibility for your actions and any consequences that may arise from using this software. The developers and distributors of this setup disclaim any liability or responsibility for any misuse, harm, or damages resulting from the use of a MITM proxy tool. Use of this tool implies that you understand and accept these terms and will not use it in any manner that violates applicable laws, regulations, or ethical standards.
The Scenario #
First, did you read the DISCLAIMER? Read it!
You’re writing a data API backend for a mobile app. You need to devtest or debug against your locally running backend, but the app doesn’t have any developer hidden settings or Easter egg, e.g., to set the API domain. Production mobile apps should absolutely not have any test or debug “hidden menus”.
The mitmproxy app can proxy the mobile app API calls to a local server, handling https with a fake cert and CA. Setup is straightforward, but a little hard to fish out of the docs. This document is a quick how-to and might save you some and trial/error time if you’ve never setup a man-in-the-middle proxy before.
Note: the Charles Proxy also supports this setup, but I find its freemium features annoying and its documentation a little scattered, at least for this use case. Furthermore, mitmproxy is open source, carefully built with security in mind, and has a very powerful custom add-on capability. Otoh, I can recommend the Charles Proxy iOS app, which is quite handy for sniffing traffic on your mobile device.
How mitmproxy Works #
The How mitmproxy works page is worth reading, but the essential bit is
Mitmproxy includes a full CA implementation that generates interception certificates on the fly. To get the client to trust these certificates, we register mitmproxy as a trusted CA with the device manually.
Proxy Setup #
I’ll refer to your local computer, where you can run an API service for a mobile app, as dev host below, and your mobile device as iOS device.
Install mitmproxy on your dev host #
Installation instructions at https://docs.mitmproxy.org/stable/overview-installation/
Get your dev host’s local IP address #
It helps to know your subnet mask here, typically starting with 192.168, 172.16 or 10.. Your local system connects to the network with this address. Note that this address can change with time, but not often if the router (DHCP server specifically) does not get reconfigured or replaced. (If you have access, most DHCP services allow your to lock in an address for your MAC, beyond scope here.)
OSX and Linux with net-tools installed #
Open System Preferences->/Network/ and select your network, look for the IPv4 Address entry. Or, in a terminal
ifconfig | grep "inet " | grep -v 127.0.0.1
should show you the address you’re looking for.
Newer versions of Linux #
ip -4 addr | grep "inet " | grep -v 127.0.0.1
Install mitmproxy CA certs #
Run mitmproxy #
First we need to install and trust mitmproxy’s fake root certificates on our iOS device and on our dev host. Mitm provides a URL that, when accessed through mitmproxy, lets you download those certs. This approach is recommended, but there are manual installation instructions available if you need them.
On your dev host open a terminal and run
mitmproxy --listen-host 0.0.0.0 --listen-port 8080
Firewall checkpoint
If you’re running a local firewall you may get an alert asking if traffic to port 8080 should be allowed. “Yes”.
If you’re running
ufwon Linux, that “alert” is probably in/var/log/auth.logand you’ll need to runsudo ufw allow from 192.168.1.0/24 to any port 8080substituting you’re local network mask for
192.168.1.0/24.
Point your local system at the mitmproxy #
Rather than repeat something well documented on the net, a search for browser set manual proxy server should turn up adequate instructions. You should end up at a screen similar to
Select Manual, enter your dev host’s IP address from above as the HTTP Proxy, enter 8080 as the port. Don’t select any form or authentication (if offered). If there’s an Ignore Hosts setting, that is completely optional. We’ll only use this proxy setup one time on the dev host, to get certs, and then disable it.
Install CA cert on dev host #
Back at a browser enter the site http://mitm.it/, making sure to use http here, not https. You should get this page.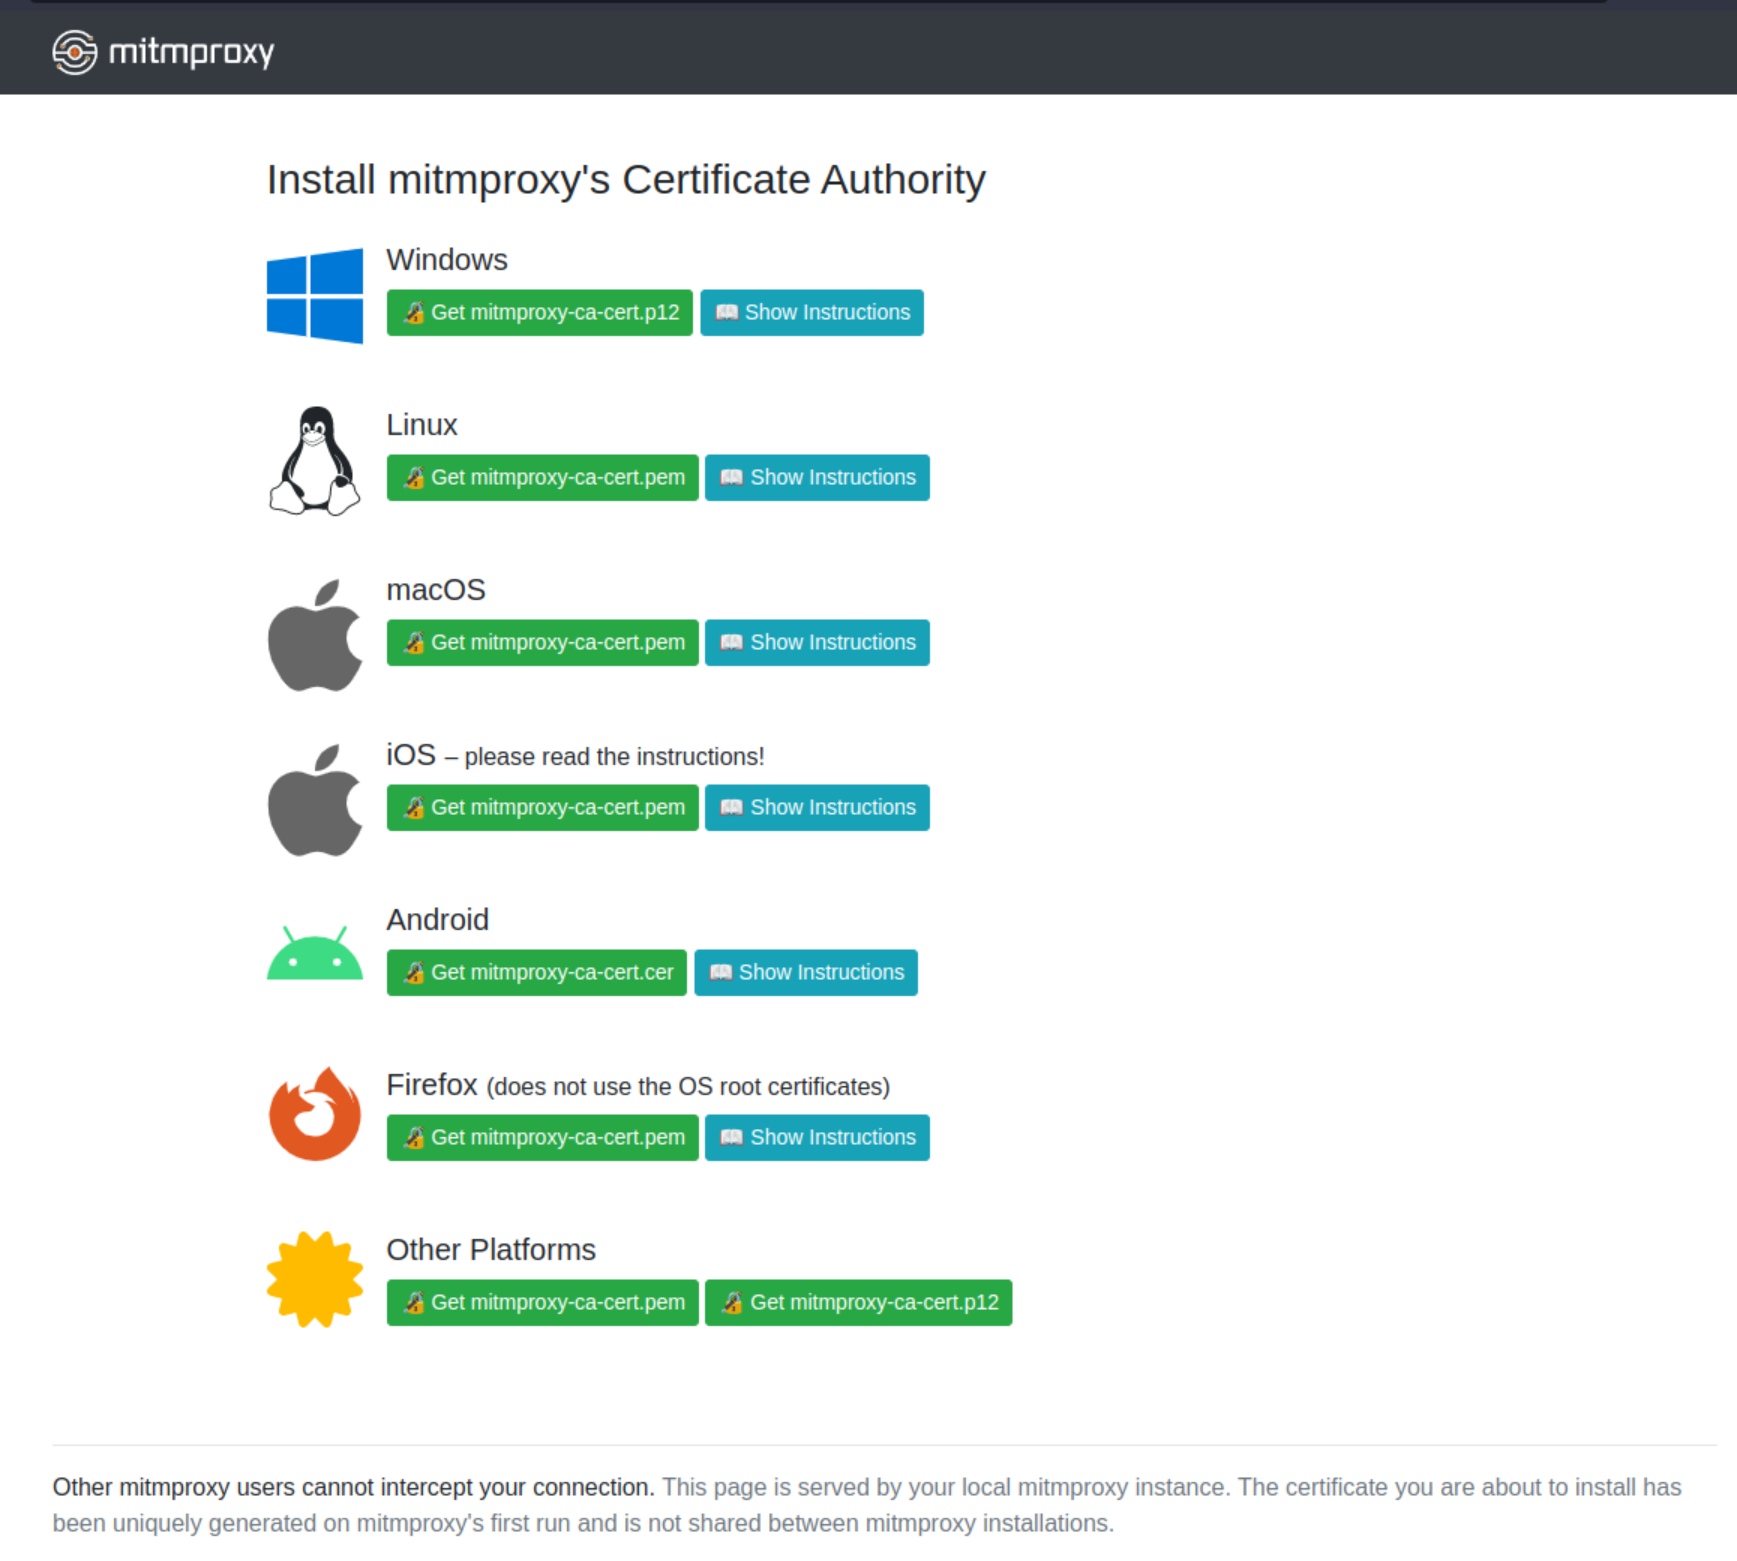
Click Show Instructions and then the green Get mitmproxy-ca-cert.pem button for you platform. Follow those instructions.
Security Note
The fine print at the bottom
Other mitmproxy users cannot intercept your connection. This page is served by your local mitmproxy instance. The certificate you are about to install has been uniquely generated on mitmproxy’s first run and is not shared between mitmproxy installations.
is an essential feature that keeps your CA cert unique and prevents potentially malicious hacking by others. Do not let this cert be compromised!
Disable the proxy on dev host #
Your dev host is setup, disable the proxy from the same place you set it up.
Install CA cert on iOS device #
The iOS device CA cert setup is analogous. I’ll refer you to iOS set manual proxy server for instructions. Make sure you use the same network that your dev host is on. You should get to this screen and enter the same Server and Port as your dev host.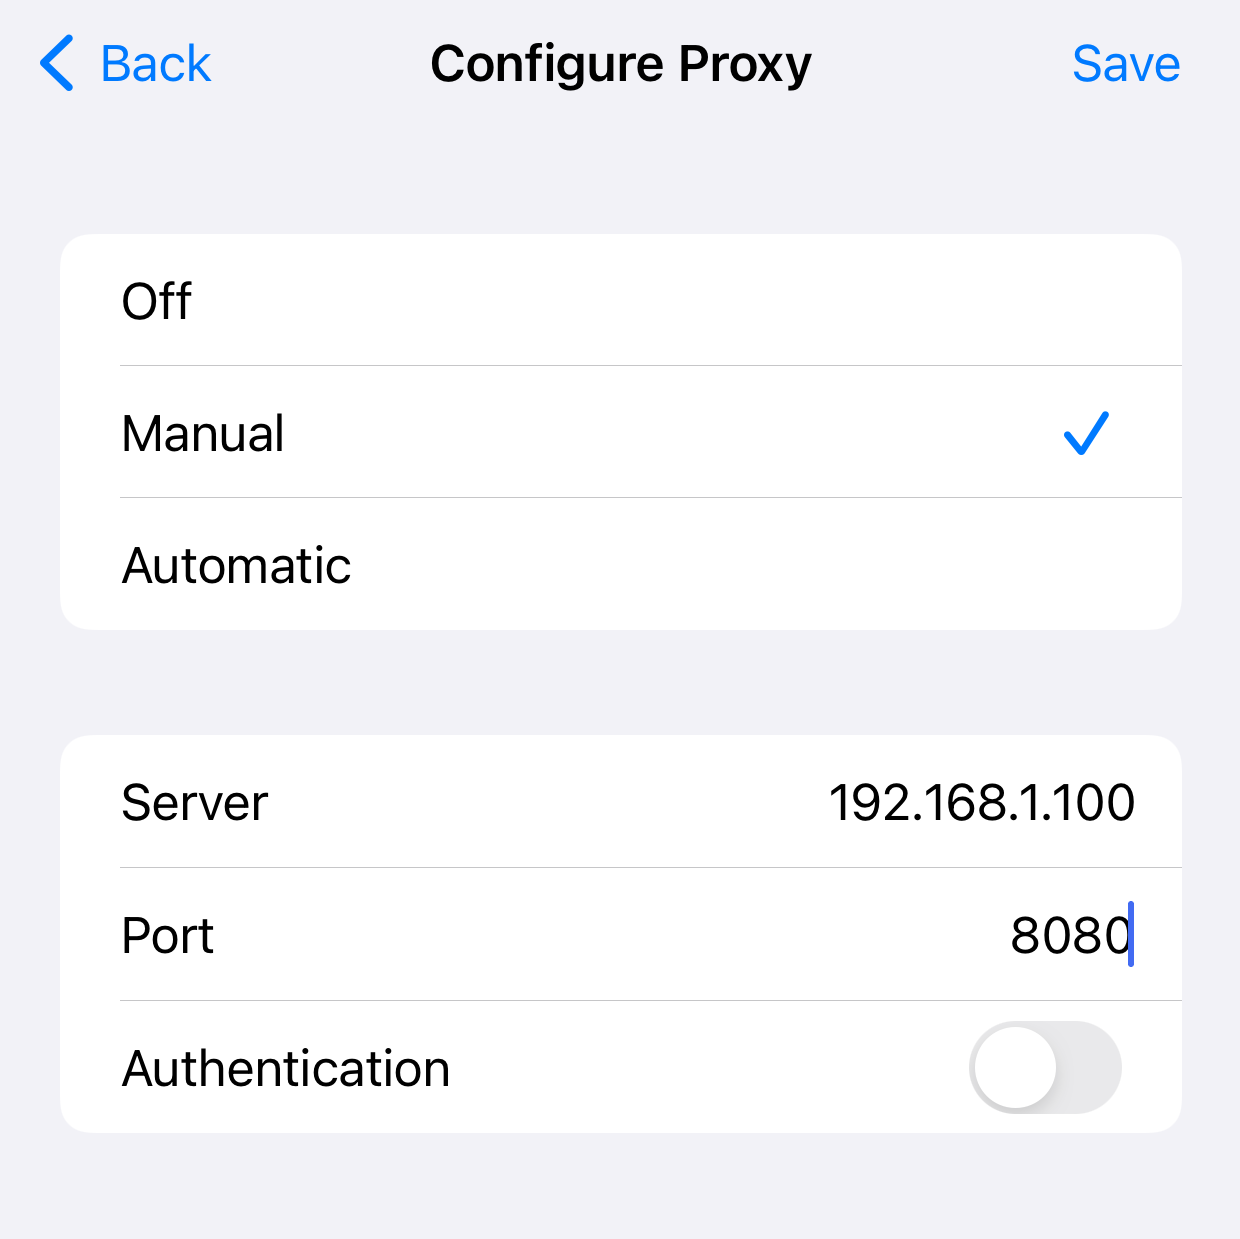
Open Safari and again browse to http://mitm.it/, download the cert and follow the instructions, making sure you include the Important: step.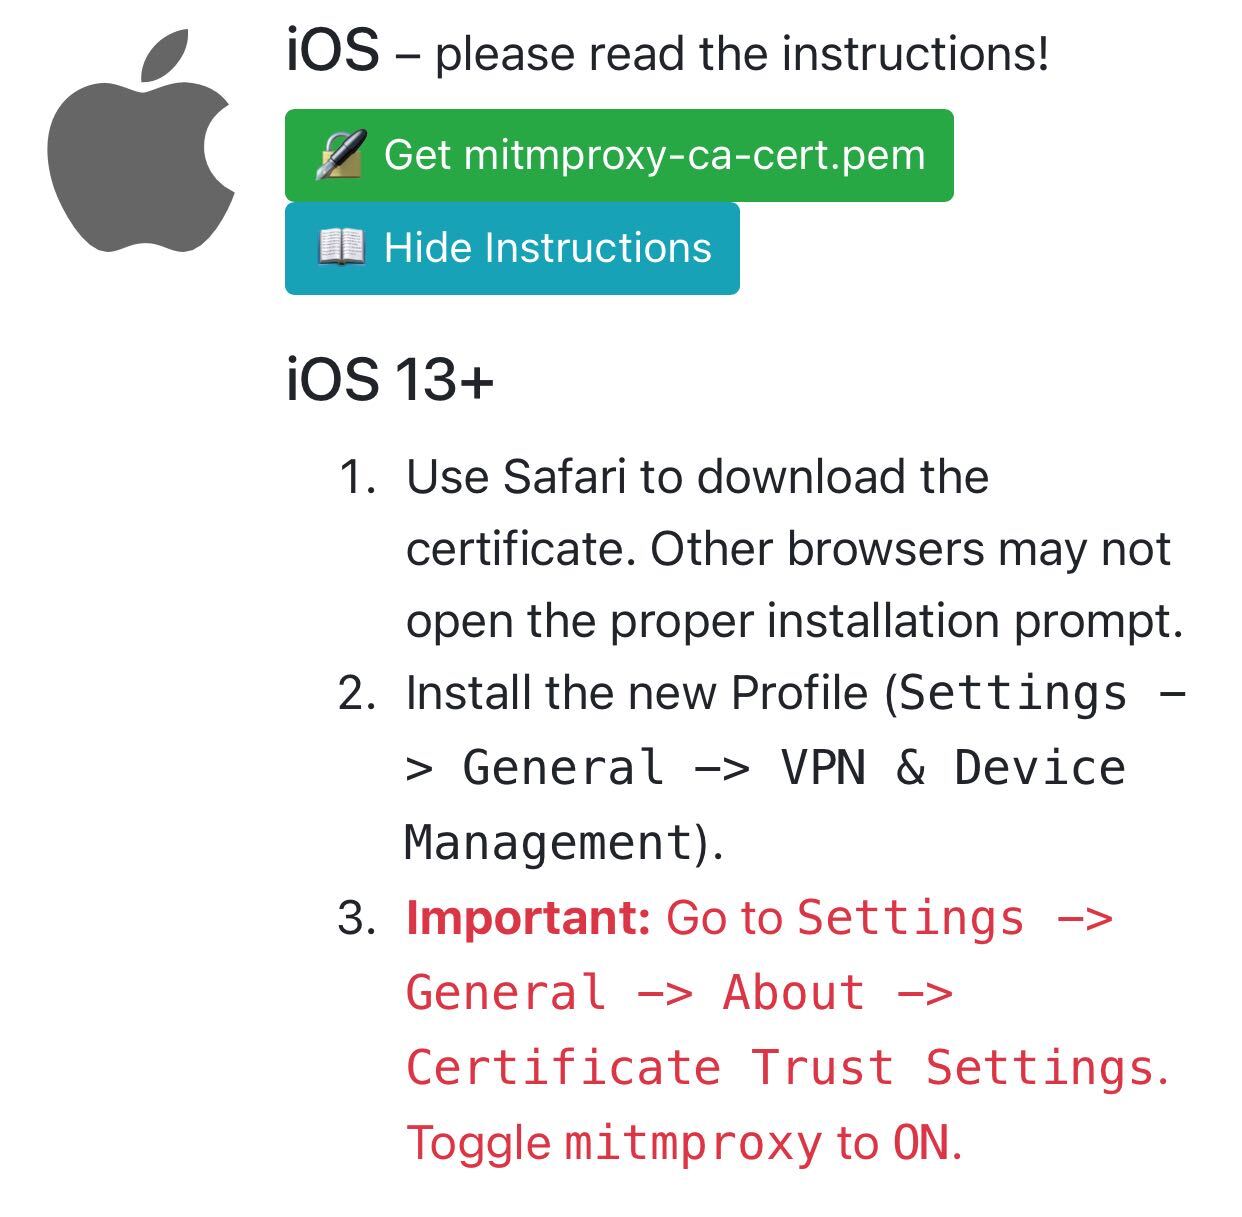
Let’s Go! #
Now we’re ready to roll!
Checklist #
- Your local API service is up and running. I’ll assume it’s on port
3000, adjust as needed. - Your iOS device is setup with manual proxy to your dev host on port
8080. (The dev host does not need to point at the proxy.) - The iOS app you want to test with is installed on your device.
Map Traffic to Your Dev Host #
Stop any running mitmproxy with a q command and start it back up with with the --map-remote option, replacing example.com with the domain name of the API your want to map to your dev host.
mitmproxy --map-remote '|https://example.com|http://localhost:3000'
If there are multiple APIs, use multiple --map-remote options. Or, you can edit the map_remote setting while the proxy is running with the O command, click or arrow down to map_remote, hit ENTER to edit, ESC to finish, and q to return to the options list. (One more q to return to the Flows screen.)
Try It Out #
Start your app on your iOS device. Requests to the mapped domains should be routing to your local dev host. Verify with request logging.
Back it Out #
As mentioned, when not actively needed it is recommended to disable the proxy setup. On your dev host, just don’t run mitmproxy. For a permanent disable, remove your locally installed CA cert from the system. What you did in Install mitmproxy on your dev host, undo that.
On your iOS device un-trust the CA from Settings -> General -> About -> Certificate Trust Settings. That’s good enough for temporary disablement. Delete the profile for a permanent backout (Settings -> General -> VPN & Device Management.)
Postscript #
The mitmproxy program can do many other useful things for development and testing. See the features section for a list of baked in capabilities. And if you need even more customization, there’s an addon capability; you can write your own Python code for custom effects. The examples dir in the mitmproxy repo is full of interesting stuff. Tools for the toolbox.