Your Own Claude Code Cloud: Remote Control, Worktrees, and a Locked-Down Unix Account
Table of Contents

Why Bother? #
Claude Code’s cloud sessions are great for a quick task against a GitHub repo: pick the repo, type a prompt, get a PR. But after a few weeks of real work in them I kept hitting the same walls:
- Each session is its own container. Fresh clone, fresh environment, reclaimed when idle. Nothing I install or configure sticks.
- One top-level agent per container. Subagents, yes. But I wanted several independent agents on the same repo at once, each on its own branch, each one I can talk to directly.
- The environment is theirs, not mine. Tooling, plugins, network policy and credentials are whatever the environment allows.
Meanwhile I already run a dedicated Linux server. Claude Code’s Remote Control mode lets a process on your own machine show up in claude.ai and the mobile app as a place to run sessions. Add git worktrees, a locked-down unix account, and systemd, and you get something that feels like the cloud product but is yours: persistent, extensible, and as open or closed as you choose to make it.
This is the how-to.
What You End Up With #
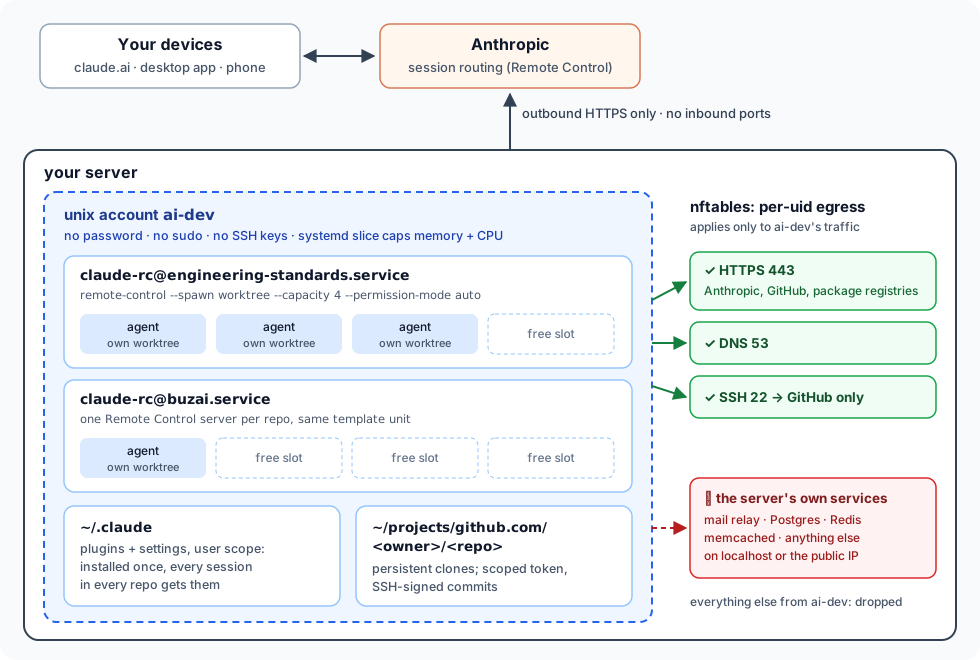
Click the diagram to open it full size.
In the claude.ai session picker, each repo shows up under Remote Control. Click New, pick the repo, type a prompt, and you’ve started another top-level agent in its own worktree.
You’ll need: a Linux box with systemd (I’m on Ubuntu 22.04), sudo on it, a Claude Pro or Max subscription, and a GitHub account.
Or Let Claude Code Set It Up #
I didn’t type most of this. A Claude Code session on the same server drafted every command, and I ran the root ones. You can do the same. Point a session with SSH and sudo at this page, but keep it on a short leash:
Read https://rm.rmdashrf.net/posts/claude-code-own-cloud/ and set this up on this server for a user called
ai-devand the repo<owner>/<repo>. Show me each sudo command and wait for my OK before running it. Stop and hand me the terminal for the Claude login, the GitHub token, and the trust prompt. Run the firewall tests at the end and show me the raw output.
Four steps stay yours: the Claude /login, creating and pasting the GitHub token, adding the signing key on GitHub, and the “trust this folder” prompt. Secrets should never pass through an agent’s conversation.
Caveat emptor: the agent doing the setup runs outside the protections it’s building, as your admin account, with root. So don’t run it in auto mode: approve each command. This is also exactly where prompt injection bites. A page that feeds an agent root commands is effectively running your server, and a copied, tampered-with or outright malicious version of these instructions could slip in one extra line you’d never notice.
- ➜Stick to the canonical URL.
- ➜Read every command before you approve it.
- ➜Read the test output yourself rather than taking "all green" on faith.
1. A Dedicated Account #
Agents run shell commands, and in auto mode they don’t ask first. So they don’t run as me. My convention is one <name>-dev account per separately threaded body of work. This one is ai-dev.
sudo adduser --disabled-password --gecos "AI dev agents" ai-dev
sudo chmod 750 /home/ai-dev
sudo loginctl enable-linger ai-dev
sudo systemctl set-property user-$(id -u ai-dev).slice MemoryMax=12G CPUQuota=500%
- No password, no sudo, no groups. Watch out for
dockerin particular: membership in it is root in all but name. - No SSH keys either. I get in from my own account with
sudo -iu ai-dev. Remote Control only makes outbound connections, so the account never needs to accept a login. - Linger keeps ai-dev’s services running across reboots and logouts. By default, Linux ties a user’s background services to their login: they start when you log in, stop when you log out, and don’t come back after a reboot until you log in again. Fine for a desktop, but ai-dev never logs in; you just borrow its shell with
sudo. Linger tells systemd to start its services at boot and keep them running regardless, so the Remote Control servers in step 5 behave like always-on server software. - The slice caps memory and CPU (5 of 8 cores here), so a runaway test suite can’t starve everything else on the box.
2. An Egress Firewall for That Account Only #
This step matters more than it looks. A typical server runs services on localhost that trust any local user: an MTA that relays mail from 127.0.0.1, a Redis or memcached with no password, and so on. A hijacked agent that can talk to your MTA can send mail as you, from your IP.
nftables (the successor to iptables; on recent Ubuntu, iptables is already a front end to it) can match packets on the uid of the process that sent them. The table below applies only to ai-dev and leaves every other user alone. It’s a separate table, so it coexists with ufw. A packet has to pass both, and a drop in either wins.
Create the rules file. Adjust the local_svcs ports to match what your box listens on (check with ss -ltnp), then run this as a sudoer to write /etc/nftables-ai-dev.nft:
sudo tee /etc/nftables-ai-dev.nft >/dev/null <<'EOF'
table inet ai_dev {}
delete table inet ai_dev
table inet ai_dev {
  set local_svcs {
    type inet_service
    elements = { 25, 465, 587, 5432, 6379, 11211 }   # mail, postgres, redis, memcached: list yours
  }
  # GitHub git endpoints (from api.github.com/meta, "git" key)
  set github_git4 {
    type ipv4_addr; flags interval
    elements = { 140.82.112.0/20, 143.55.64.0/20, 185.199.108.0/22, 192.30.252.0/22 }
  }
  set github_git6 {
    type ipv6_addr; flags interval
    elements = { 2a0a:a440::/29, 2606:50c0::/32 }
  }
  chain out {
    type filter hook output priority 0; policy accept;
    meta skuid != "ai-dev" accept               # everyone else: untouched
    ct state established,related accept
    oif "lo" tcp dport @local_svcs drop         # no local mail/db/cache
    oif "lo" accept                             # DNS stub + its own dev servers
    tcp dport @local_svcs drop                  # ...nor via the public IP
    tcp dport { 80, 443 } accept
    udp dport { 53, 443 } accept
    tcp dport 53 accept
    ip  daddr @github_git4 tcp dport 22 accept  # ssh to GitHub only
    ip6 daddr @github_git6 tcp dport 22 accept
    drop
  }
}
EOF
The table … {} / delete table … pair at the top is a clean-reload idiom for older nft versions without destroy: reloading the file always gives you exactly its contents, never duplicate rules.
Load it, persist it with a small oneshot unit, and test it. Don’t put the rules in /etc/nftables.conf: that file starts with flush ruleset, which would wipe ufw’s rules too.
sudo nft -c -f /etc/nftables-ai-dev.nft && sudo nft -f /etc/nftables-ai-dev.nft

sudo tee /etc/systemd/system/nft-ai-dev.service >/dev/null <<'EOF'
[Unit]
Description=nftables egress policy for ai-dev
After=network-pre.target ufw.service
[Service]
Type=oneshot
ExecStart=/usr/sbin/nft -f /etc/nftables-ai-dev.nft
RemainAfterExit=yes
[Install]
WantedBy=multi-user.target
EOF
sudo systemctl daemon-reload && sudo systemctl enable --now nft-ai-dev

# Expect: BLOCKED · an HTTP status line · OPEN · BLOCKED
sudo -u ai-dev timeout 5 bash -c 'exec 3<>/dev/tcp/127.0.0.1/25' && echo OPEN || echo BLOCKED
sudo -u ai-dev curl -sI https://api.anthropic.com | head -1
sudo -u ai-dev timeout 5 bash -c 'exec 3<>/dev/tcp/github.com/22' && echo OPEN || echo BLOCKED
sudo -u ai-dev timeout 5 bash -c 'exec 3<>/dev/tcp/gitlab.com/22' && echo OPEN || echo BLOCKED
Be honest with yourself about what this does and doesn’t buy. With 443 open to the world, an agent can still upload anything it can read to any website. The firewall protects your other services and your IP’s reputation. What protects your data is the account boundary: ai-dev simply can’t read your home directory, your secrets or your mail. The secrets it does hold are covered in step 8.
3. Install Claude Code and Log In #
sudo -iu ai-dev
Two gotchas before you paste anything else:
sudo -iustarts a new shell, and that shell swallows the rest of a multi-line paste. Run it on its own line, then paste the next block.sudo -iudoesn’t create a systemd login session, sosystemctl --userfails with “Failed to connect to bus.” Linger keeps the user manager running; the shell just needs to be told where it is.
cat >> ~/.bashrc <<'EOF'
export PATH="$HOME/.local/bin:$PATH"
export XDG_RUNTIME_DIR=/run/user/$(id -u)
EOF
source ~/.bashrc
curl -fsSL https://claude.ai/install.sh | bash
claude
Inside claude, run /login and pick the Claude account with subscription. On a headless box it prints a URL: open it on your laptop, sign in, and paste the code back.
Every agent here draws on your one subscription’s usage limits. That’s worth knowing before you start several at once.
4. GitHub Access, Scoped Down #
Create a fine-grained personal access token for ai-dev, not your everyday credentials. On GitHub: Settings → Developer settings → Fine-grained tokens → Generate new token:
- Resource owner: you. Expiration: 90 days.
- Repository access: Only select repositories.
- Permissions: Contents, Pull requests and Issues set to read/write. Actions and Commit statuses set to read. Add Workflows only if agents should edit CI.
Adding a repo later means editing the token’s repo list on GitHub; nothing changes on the box.
Then, as ai-dev, log gh in with the token and clone your first repo:
gh auth login --hostname github.com --git-protocol https   # "Paste an authentication token"
gh auth setup-git
git config --global user.name  "Your Name"
git config --global user.email "you@users.noreply.github.com"
mkdir -p ~/projects/github.com/<owner> && cd ~/projects/github.com/<owner>
gh repo clone <owner>/<repo>
Pasting the token at gh’s prompt keeps it out of your shell history and process list. The ~/projects/github.com/<owner>/<repo> layout is borrowed from Go’s module paths: the path tells you the remote, and the remote tells you the path.
5. One Remote Control Service per Repo #
A systemd template unit gives you one Remote Control server per repo, each named after it.
Create the unit file. As ai-dev, replace <owner> with your GitHub user or org, then run:
mkdir -p ~/.config/systemd/user
cat > ~/.config/systemd/user/claude-rc@.service <<'EOF'
[Unit]
Description=Claude Code Remote Control (ai-dev: %i)
After=network-online.target
[Service]
WorkingDirectory=%h/projects/github.com/<owner>/%i
ExecStart=%h/.local/bin/claude remote-control --name ai-dev-%i --spawn worktree --capacity 4 --permission-mode auto
Restart=always
RestartSec=10s
Environment=PATH=%h/.local/bin:/snap/bin:/usr/local/bin:/usr/bin:/bin
[Install]
WantedBy=default.target
EOF
The %i in the unit is the part after the @: enabling claude-rc@myrepo runs a server for ~/projects/github.com/<owner>/myrepo. The three flags that make this work:
--spawn worktreegives every session started from claude.ai its own git worktree and branch, so concurrent agents never step on each other’s files. The other modes aresame-dir(the default) andsession(a single classic session).--capacity 4caps concurrent sessions per repo. The default is 32, which is more agents than your usage limits will feed.--permission-mode autostarts spawned sessions in auto mode instead of asking before every command. That’s reasonable because of steps 1 and 2; I wouldn’t do it on my own account.
Before enabling the service, do two one-time steps from inside the repo. Claude Code won’t save “trust this folder” for your home directory, by design, and the service fails in a restart loop (“Workspace not trusted”) until the repo itself is trusted:
cd ~/projects/github.com/<owner>/<repo>
claude                                        # choose "Yes, I trust this folder", then /exit
echo y | timeout 8 claude remote-control --name ai-dev-<repo>   # one-time "Enable Remote Control?"
Then reload systemd, enable the service for the repo, and watch it start:
systemctl --user daemon-reload
systemctl --user enable --now claude-rc@<repo>
journalctl --user -u claude-rc@<repo> -f
To make auto mode the default for sessions you start by hand in an ai-dev shell too:
f=~/.claude/settings.json; [ -f "$f" ] || echo '{}' > "$f"
jq '.permissions.defaultMode = "auto"' "$f" > "$f.tmp" && mv "$f.tmp" "$f"
6. Plugins, Installed Once #
Plugins installed at user scope apply to every session the account starts, in every repo. I use Every’s Compound Engineering plugin: a brainstorm → plan → build → review → capture-learnings loop.
As ai-dev, install it and restart the services:
claude plugin marketplace add EveryInc/compound-engineering-plugin && \
claude plugin install compound-engineering@compound-engineering-plugin --scope user && \
systemctl --user restart 'claude-rc@*'
Sessions that were already open before the restart won’t see new plugins; new ones will. Plugins attached to your claude.ai account also sync onto the box, and claude plugin list shows which copy wins when the names collide.
7. Signed Commits #
Cloud sessions produce “Verified” commits. Yours can too, with an SSH signing key.
As ai-dev, generate the key and turn on signing. Use the same noreply address your commits use:
ssh-keygen -t ed25519 -C "ai-dev commit signing" -f ~/.ssh/id_ed25519_signing -N "" && \
git config --global gpg.format ssh && \
git config --global user.signingkey ~/.ssh/id_ed25519_signing.pub && \
git config --global commit.gpgsign true && \
git config --global tag.gpgsign true && \
echo "you@users.noreply.github.com $(cat ~/.ssh/id_ed25519_signing.pub)" > ~/.ssh/allowed_signers && \
git config --global gpg.ssh.allowedSignersFile ~/.ssh/allowed_signers && \
cat ~/.ssh/id_ed25519_signing.pub
Then register the printed public key on GitHub: Settings → SSH and GPG keys → New SSH key (not the GPG form), set Key type: Signing Key, paste the whole line, and save. A signing key can sign commits but can’t log in or push. There’s no passphrase because unattended agents can’t type one; if the box is ever compromised, delete the key on GitHub and it’s dead. Git reads its config on every run, so already-running sessions pick this up with no restart.
8. Secrets: What the Account Holds #
When you’re done, ai-dev holds exactly three credentials. All are plain files readable only by the account (mode 600); a headless box has no keyring to put them in.
| Secret | Where it lives | If it leaks, someone can… | Risk | Revoke |
|---|---|---|---|---|
| Claude login | ~/.claude/.credentials.json | Run Claude Code on your subscription and burn your usage | Medium-high | /logout, or end the session in claude.ai settings |
| GitHub token | ~/.config/gh/hosts.yml | Push, open PRs and edit issues in the selected repos only, until it expires | Medium; low if main requires PRs | Delete the token on GitHub |
| Signing key | ~/.ssh/id_ed25519_signing | Make “Verified” commits in your name. It can’t push or log in | Low-medium | Delete the signing key on GitHub |
The agents can read all of these. They run as the same user, so there’s no hiding a secret from them, and a malicious instruction buried in a web page or an issue could send one out over HTTPS. So the rule isn’t “hide them well”. It’s few, narrowly scoped, short-lived, and easy to revoke.
Do these:
- Protect
main. On GitHub, go to the repo’s Settings → Branches and require a pull request before merging. A leaked token then gets “open a PR you’ll review” instead of “push to production”. It’s one setting, and the best return in this table. - Keep app secrets out of the account. No
.envfiles full of production keys in the clones or worktrees. If tests need credentials, use dev-only keys with low limits, or none. (I wrote this up as a standard of its own: keep application secrets out of the developer’s working tree.) - Know your revocation drill. If the box is ever compromised, work down the table: log out Claude, delete the GitHub token, delete the signing key. It takes about five minutes.
What’s deliberately not in the account matters just as much: no personal cloud keys, no mail, nothing from your own account. That absence is the real protection.
Using It #
In claude.ai (or the desktop app, or the phone), start a new session, open the environment picker, and go to Remote Control. Each repo is listed with a count like 1 of 4 sessions. Pick one and type. Every new session is another independent top-level agent in its own worktree.
It’s just as usable from a phone. Here’s one of those agents from my pocket: connected to the server, working an issue in its own worktree, and waiting on a one-letter answer before it carries on.
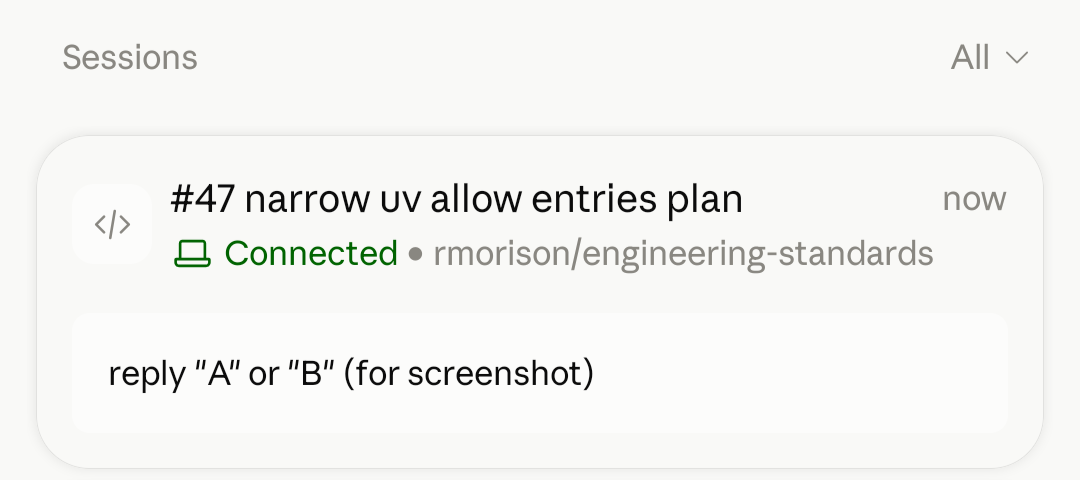
A couple of things I learned the hard way:
- The picker shows folder names, not your
--name. If two services run in folders with the same name (say, two users’ clones of the same repo), you’ll see duplicates. The capacity number is how I tell them apart. - Archiving a session frees its slot. The worktree and branch may stay behind, which is a sensible safety default. Merge the PR, ask the agent to remove its worktree, then archive.
git worktree listandgit worktree prunehandle the rest.
Cloud vs. Your Own Box #
| Claude Code cloud sessions | Your own box | |
|---|---|---|
| Setup | none | an afternoon |
| State between sessions | fresh container each time | persistent: tools, caches, clones |
| Concurrent agents per repo | one per container | --capacity per repo, each in a worktree |
| Plugins and config | what the environment allows | anything, installed once at user scope |
| Network policy | the environment’s | yours, down to per-uid firewall rules |
| Hardware | theirs, fast | yours, as old or new as it is |
| Blast radius | a disposable container | whatever you let the account touch |
The last row is the whole game. The cloud gives you isolation for free. On your own box, isolation is something you build, which is what steps 1 and 2 are for. Do those first.
Wrap-up #
Put together, this is a small private “agent cloud”: several independent agents per repo, reachable from a phone, with persistent tooling and a security boundary I can reason about line by line. And adding a repo is a clone, a trust prompt, and one systemctl --user enable --now claude-rc@<repo>.
It isn’t a replacement for the cloud product so much as the open-ended version of it. When I want a quick, disposable session, I still use theirs. When I want a team of agents on a repo I care about, they run here.

P.S. I don’t cover Docker or Podman here, but they’re the obvious next step: agents will want test databases and docker compose up. Don’t solve it by adding the account to the docker group. That’s root-equivalent, and container traffic routes around the per-uid firewall. A rootless Docker daemon (or rootless Podman) owned by the agent account keeps both boundaries intact. That’s a post of its own.
Written with the editorial assistance of Claude. Drafted by Opus via Claude Code, from the session that did the setup described here.